Rectangular Undermount Antique - Copper Kitchen Sink
Hand Hammered Copper
- Description
- Specs
- Reviews
Be aware that all of our sinks are handcrafted. Each sink will have its own unique characteristics - no two sinks are identical. Thus there will be color, size, and design variations compared to the photo shown. Our copper sinks are living finishes and do not have protective coatings. They will change with time and use.
Any liquid coming in contact with your sink can affect the finish, Tierrayfuego.com does not warrant the finish after installation.
Definitely not your typical mass marketed bathroom fixtures, our recycled copper sinks are handmade created by skilled coppersmiths artisans. The crafts people heat and soften the metal over an open forge, using an anvil and hammer to slowly and methodically transform the recycled material into a perfectly formed sink.
When you use a Mexican copper sink in your bathroom design, you are actively participating in the green building design movement by utilizing recycled copper, collected by the artisans who make the sinks. Their skills, diligence, and hard work transforms construction copper, electrical wires, and pipes that might otherwise end up in landfills into elegant decorative elements for home bathroom decor.
Our sinks come in 3 finishes: Natural, Dark Patina (Antique), and Nickel. Some finishes such as the Antique are achieved by accelerating the aging process which results in a distinctive patina color. The finish of a natural copper sink is naturally reddish in color and will vary from one sink to another. The sink may present dark spots or streaks due to the nature of the copper itself and the final look of the sink depends on the copper sheet it is made from. The color of the copper will gradually change with time, and it will take on a warm medium patina as it ages.
Today’s kitchen is the place where family and friends gather to talk, laugh and enjoy each other over the preparation of a great meal. The kitchen is where memories are made. Set off your kitchen area with the custom look and feel of our hand hammered sinks. The old fashioned farmhouse copper kitchen sink, also called an copper apron sink, is suddenly getting a lot more popular. These sinks don't sit hidden in the counter like a standard sink. Instead, the front of the sink is exposed, and may even stick out above the cabinetry. They're used in kitchens where the decorating scheme hearkens back to an earlier time, and also go well with Continental decor. If you're thinking about adding a bit of traditional elegance to your kitchen, farmhouse kitchen sinks might be one option.
Rectangular Undermount Antique - Copper Kitchen Sink
| Specifications | Description |
|---|---|
Size of Sink | 22x33 in. outside dimension, 10.5 in. outside height, 17x28 in. inside dimension, 10 in. inside depth, 2.5 in. lip |
| Copper Thickness | 16 Copper Thickness |
| Drain Opening | 3.5 in. |
| Overflow | No overflow holes |
| Installation Type | Under mount or Drop-in |
| Material | Hand hammered copper. |
| Care Recommendations | Clean with mild cleanser and damp cloth, do not use abrasive cleaners. |
| Cleaning Your Copper Sink | Use a mild detergent such as liquid dishwashing soap and warm water for cleaning. Do not use abrasive cleaners that may scratch or dull the surface. |
| Carefully read the cleaner product label to ensure the cleaner is safe for use on the material. | |
| Always test your clearing solution on a inconspicuous area before applying the entire surface. | |
| Do not allow cleaners to sit or soak on the surface. | |
| Wipe surfaces clean and rinse completely with water immediately after cleaner application. Rinse and dry over spray that lands on the nearby surfaces. | |
| Use a soft, dampened sponge or cloth. Never use abrasive material such as brush or scouring pad to clean surfaces. | |
| Other Considerations | The Patinas are created by a firing process and will change over time, developing more interest and variations. A copper finish is a living finish and never really stops changing in color. You can greatly reduce this change with the use of auto wax and or furniture oil such as Pledge Lemon Oil. Sinks can also be sealed with olive oil. |
| Please be aware that all Tierrayfuego.com\'s rustic sinks and tubs have a finish that is by nature uneven and variable in color, size, and pattern. In addition, the dimensions and consistency of shape can vary considerably. We offer these sinks and tubs with the view that these variations are part of the rustic character and charm, and do not constitute defects. | |
| Copper is also malleable. Materials that are malleable can be hammered or stretched or rolled into various shapes with relative ease, while still maintaining their strength. Some metals, like copper, are also ductile, which means they are flexible. Should your sink arrive with a bent edge, it can be hammered back into position with little effort. Use a wooden or rubber mallet to straighten any edges that may have been altered in shipping. | |
| All of our Mexican sinks are made of reclaimed copper which naturally posses anti microbial properties to prevent germs and bacteria from surviving on the surface of raw, unsealed copper. | |
| Copper has been recognized as a hygienic material since the dawn of civilization and, in the last two centuries, the anecdotal evidence has been supported by scientific research showing that copper is anti microbial, i.e. it inhibits the growth of harmful pathogens - bacteria, moulds, algae, fungi and viruses. | |
| Hard Water - If you have hard water in your area, keep your copper sink and drain clean and dry by wiping it down with a soft cloth after every use to avoid spotting. Hard water will affect copper as it would any other type of metal, and it will be difficult to remove these spots. You can also help protect your sink from hard water minerals by periodically applying wax to your sink which will help maintain its luster and provide better water runoff. | |
| Acid Foods – Do not leave any acid based foods on your sink for a prolonged period of time such as tomatoes, oranges or lemons. If you do, the acid may produce a shiny spot on your finish. If this happens, we recommend you clean it with soap and water and wait for the finish to recover its patina – the copper will age with time and the spot will blend back with the rest of the copper. | |
| Color, Size and Design Variation | Slight variations are expected for all Talavera Tiles. For instance, size, color and design are all likely to vary due to the hand made process. Please note shades of color are seen differently on computer monitors and therefore customers should request a sample before making a final selection or purchase. Lot variation in size and color may be present from shipment to shipment. There is no guarantee that tiles ordered as add-ons will match those from the original orders. |
| Installing a Mexican Bathroom Countertop Sink | Since no template is provided with this sink, set the bowl upside down on the countertop and trace the outline, then draw a second line about 3/4 inch inside that line to serve as your cut line. |
| Carefully drill a 3/8-inch starter hole inside the cut line. Using a saber saw, begin cutting along the line. After you have completed the cutting the hole, insert the sink into the hole in the countertop to test the fit. Make any adjustments if necessary. | |
| Place a bead of plumber\'s putty around the bottom edge of the drain-assembly housing\'s lip and then press the housing into the drain hole. Attach the gasket and washer and then tighten the locknut. Be careful not to apply to much pressure because the drain hole may break. Remove any excess plumber\'s putty. Attach the tailpiece to the housing with the slip nut and washer. | |
| If you haven\'t already done so, install the faucet. When the faucet is in place, turn the sink upside down and run a bead of silicone adhesive along the underside of the molded lip. Turn the sink over and carefully align it with the countertop\'s front edge. Press firmly around the lip to form a tight seal. After the adhesive has set, apply a bead of latex caulk around the edge and then smooth it with a wet finger. | |
| Set the sink in place, firmly pressing down all edges to assure a secure seal. | |
| These tips are meant as a helpful resource. Tierra y Fuego strongly suggests consulting a licensed contractor. |
Frequently Bought Together:
-
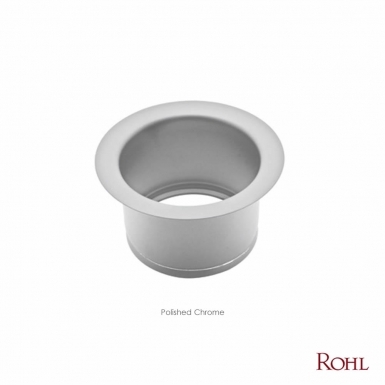 ROHL Extended Disposal Flange
$154.35 - $211.05Item# ISE10082Quick Shop
ROHL Extended Disposal Flange
$154.35 - $211.05Item# ISE10082Quick Shop -
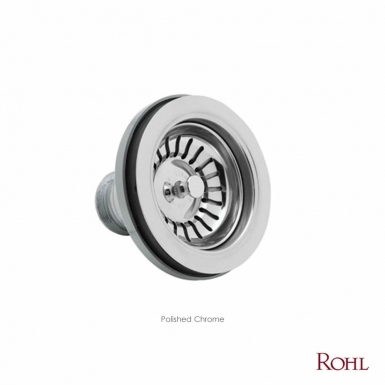 ROHL Basket Strainer Without Remote Pop-Up
$57.75 $43.31Item# 733APCQuick Shop
ROHL Basket Strainer Without Remote Pop-Up
$57.75 $43.31Item# 733APCQuick Shop